Are you looking to streamline your expense tracking by uploading receipts directly to QuickBooks Desktop? You've landed in the perfect spot! QuickBooks has revolutionized the accounting sector, offering an unparalleled suite of features and utilities that empower businesses of all sizes.
One of its most valuable, user-friendly functionalities is the ability to easily upload receipts to QuickBooks Desktop. This not only simplifies your record-keeping but also leverages intelligent automation: QuickBooks accounting software can pull crucial information from your uploaded receipts and even match them with existing transactions for your review and approval.
Whether you're using QuickBooks Desktop Pro, Premier Plus, or Enterprise, this comprehensive guide will walk you through the entire process of uploading receipts, ensuring you maximize this powerful feature for accurate and efficient financial management. Read on to master receipt management in QuickBooks Desktop!
Procedure to upload receipts to QuickBooks desktop pro plus, premier plus, or enterprise
You can perform the below steps, so as to upload the receipts to QuickBooks successfully.
Step 1: Adding the receipts to Quickbooks software
You are required to ensure to not upload any sensitive information such as credit card numbers, social security numbers, or health information.
Easy process to Upload receipts using QuickBooks desktop
Below is the process that you can follow to upload PDFs or images of the receipt to the QuickBooks desktop. The most important point that you should consider is that if you are using PDFs, you can only have one receipt per page.
Start off by heading to the vendor menu, and choose the receipt management tab.
Opt for the intuit account that you use for the company file.
Also, note that if you don’t have permission for accessing the company file or the account isn’t associated with one, then you can carry out the necessary steps for the same.
Now, drag and drop the receipts into QuickBooks or pick browse to upload, and choose the receipts.
Uploading receipts from QuickBooks desktop to IOS mobile app
The most important point to be noted here is that the QuickBooks desktop supports PDF's and images with JPEG, JPG, GIF, or PNG format. In case you make use of newer iPhone or iPad, then you might have HEIC format images. Below are the steps to convert existing images to compatible format.
Sign in to the Intuit account from the QuickBooks desktop app, and opt for the company file to upload the receipts to.
Hit on the company file to upload the receipts and then tap on the continue tab.
You are then supposed to tap on the capture receipt.
Tap on the camera icon for taking picture of the receipt or tap the photos icon to upload the receipt. In case you require, crop and rotate the photo.
Next, hit a click on use this photo option.
Add a name and memo, further hitting a hit on the upload photo and OK tabs respectively.
End the process by signing in to the QuickBooks desktop company file to review, edit, and match the receipts to transactions.
Steps to upload your receipts from QuickBooks desktop to the android mobile app
Initially, launch the QuickBooks desktop android app and hit on receipt snap.
Further, tap on continue after tapping on the company to upload receipts.
Tap on capture receipt.
Hit on the camera icon to take a picture of the receipt or tap on the photos icon to upload the receipt Just in case if you require, crop and rotate the picture.
Tap on use thisphoto option.
Enter name and memo, and head for the upload photo and OK tabs respectively.
Opt for the company to upload the receipts after signing in to the intuit account.
You will need to do this once.
Sign in to the QuickBooks desktop company file to review it, edit and match the receipts to transactions.
Emailing receipts to QuickBooks desktop
Emailing PDFs or images of the receipt to the QuickBooks company file is possible with the steps below:
Step 1: Creating a custom email address
Head to the vendor menu and choose receipt management.
Go for the intuit account you use for the company file.
Also, note that if you don’t have permission to access the company file or the account isn’t associated with one, then you can perform the necessary steps.
Go for the send receipts option.
Pick a custom email address you will email receipts to. This will end in and further choose the create option.
After you confirm the email address, the list of all the users who form a part of the intuit account will be shown to you. Where you can manage the users who can email the receipts with the help of the toggle tab.
Step 2: Emailing images of receipts to QuickBooks desktop
It should be noted that you can send multiple receipt images in one email, as long as the email size is under 20 MB.
Opt for a picture of the receipt on the mobile. Note that the photo you hit should be on PDF, JPEG, JPG, GIF, or PNG format.
Ensure that each image or file contains only one receipt.
Emailing the image to the custom email address. This might take a few minutes.
QuickBooks accounting software will automatically pull the date, amount, vendor, and the last four digits of the credit card from the image. Just in case you are uploading multiple receipts, then edit or delete them in a batch:
Head for the receipts and choose batch action.
Go for either edit or delete, if you wish to delete the receipts.
In case you go for the edit tab, make the edits to the vendor name, account, bank/card details, and date of the transactions.
Pick the save tab.
Reviewing, editing and matching the receipts to the transaction
After you upload the expense receipts in QuickBooks desktop, they will show up in the for-review tab. This is where you can review, edit, or match the transactions to the register.
Choose the vendor menu and head for the receipt management option.
Opt for the review tab and pick the refresh icon to see the receipts.
Choose a small arrow from the receipt and choose review.
In case the receipt matches the transaction, then go for the attach tab.
Or if the match is incorrect, then choose remove match then create a new transaction.
Hit the OK tab to finish the process.
Winding up!
This was all you should take into consideration for uploading receipts to QuickBooks desktop pro, plus, enterprise, etc. As always, if you have any queries or concerns, call our QuickBooks Support teamfor assistance! Our certified accounting professionals are always ready to assist you and fix the errors for you in the least possible time. Our QuickBooks experts can be contacted via the helpline 1-888-368-8874.
Before installing any software, especially robust accounting solutions like QuickBooks Desktop, it's crucial to verify your system meets the minimum requirements. This ensures optimal performance and stability and prevents frustrating issues down the line. With over 29 million businesses relying on Intuit QuickBooks in the United States, proper configuration is key to seamless operations.
This article provides a comprehensive overview of the system requirements for various QuickBooks Desktop versions, including the latest hardware and software specifications to help you make an informed decision. We'll detail the necessary operating systems, processor speeds, RAM, disk space, and other critical components for smooth QuickBooks functionality. While we aim to provide all the information you need, don't hesitate to reach out to our certified professionals for personalized consultation and expert assistance if you have any doubts.
System Requirements For QuickBooks desktop 2022 and It's all Versions & Editions
Operating Systems
Windows 10: All editions with 64-bit and Natively Installed
Windows 8.1 (update 1): All editions which include 64-bit, Natively Installed
Microsoft Windows 7 SP1: All 64-bit edition and Natively Installed
Windows Server 2016
Windows Server 2012 R2
Microsoft Windows Server 2011
Windows Server 2008 R2 SP1
Database Servers
For Windows: Windows Server 2016, Windows Server 2011, Windows Server 2012 R2 and Windows 8.1 (update 1) or Windows 7 SP1 (Enterprise and Professional editions only), also Windows Server 2008 R2 SP1, and Windows 10, natively installed.
Linux: -Only installation: OpenSuse 42.3, Fedora 27, Red Hat Enterprise 7 when you using QBES Database Server.
Browser Requirement: Internet Explorer 11 (32 bit)
Hardware and Operating System Requirements (Client and Server)
2.4 GHz processor Minimum
4GB RAM minimum and 8 GB RAM Recommended
Server RAM Requirements
8GB RAM: 1-5 Users
12GB RAM: 10 Users
16GB RAM: 15 Users
20+GB RAM: 20 Users
Disk Space
2.5 GB disk space
Additional Software is provided for Microsoft .NET 4.6 Runtime on the QB CD 60MB.
Intuit Data Protect in QB Connected Services offerings
Minimum 4 GB RAM
Twice the size of the largest file for backup or restore is required.
Windows:
When using US QuickBooks Software, US version of Windows is required
When using Canadian QB software, make use of the Canadian version of Windows.
Regional setting is supported when set to English with keyboard setting to US/CA only
Administrator rights will be required while hosting Multi-user access on server computer
Natively Installed
Optical Drive
For CD installations: 4X DVD-ROM drive.
Screen Resolution
Higher with up to 2 Extended monitors or 1280 x 1024 screen resolution
Default DPI Setting.
Software Compatibility
QuickBooks is quite compatible with users and allows them to interact with third-party applications. Integrations for this with QuickBooks are below:
Microsoft Office
Office 2016 including Outlook 2016 on 32 and 64 bit.
Office 2010 and Office 2013 and 365 both on 32 and also 64 bit (including Outlook 2010 and Outlook 2013)
Gmail Estimates, Invoices and other forms with Microsoft Outlook with office 365, Microsoft outlook 2010-2016 and other support to Gmail, Yahoo! Mail and Outlook.com.
Microsoft word 2016, 2013, or 2010 or Office 365 (includes 64-bit) for preparing letters
Microsoft Excel 2016, 2013, or 2010 or Office 365 (Includes 64-bit) to export reports
Outlook 2010 (32-bit) to contact Synchronization with Microsoft Outlook.
Requires QB contact Sync for Outlook synchronization Outlook.
QB Point of Sale Version 18.0 and Version 12.0 (applies to US only)
4 GB RAM for single workstation and 8 GB RAM for multi-user
1 Gb disk space
4 GHz processor for single users and 2.8 GHz for multi-users
Multi-core processor for multi-user implementations.
System Requirements For QuickBooks Desktop For Mac 2020, 2021 and 2022
QuickBooks for Mac (US Only)
Minimum System Requirements:
MacOS 10.12 (Sierra) ad should be supported by macOS 10.13 and macOS 10.14
2GB RAM ( 4GB Recommended)
Product registration
250 MB disk space should be available
CD/DVD Drive for download installation
Printer to print invoices, checks, etc.
Use intuit checks
Intel processor (Core Duo 2 or higher) is required
Integration/Compatibility Requirements:
To export data, Microsoft Excel 2016 or later, Apple Numbers v3.5, including Mac Office 365 are required
Apple Mail, Microsoft Outlook 2016 or later, including Mac office 365, almost all support to Email is required for Emails
Intuit Merchant Services for QB for Mac is required in order to accept debit and credit cards.
Integrating Processing Payroll: Requires a paid subscription, EIN and Internet access for QuickBooks for Mac.
To print checks and forms in QB payroll for Mac, Adobe reader and printer would be required because of the basic needs of the system. (Additional fees apply)
Top pay may differ from those of QB. even more, details visit the website at www.macpayroll.com and www.matrix.com
A one-way conversion is being supported by QBD for Mac 2019 in QuickBooks online and the same is also supported from QBD for windows 2016 to 2018
Supports Round- Tripping with QuickBooks for Windows 2019 and later as it is a better option to send data file to Accountant.
System Requirements for The Older Versions of Mac
The requirements for older versions of Mac include:
MacOS 10.10.2 and MacOS 10.11 required for QuickBooks for Mac 2016 R5 or earlier.
MacOS 10.11 and MacOS 10.12 required for Mac 2016 R6 and later
At least 2 GB RAM and 4 GB recommended
250 MB disk space
Intel Core 2 Duo or higher should be the Mac processor
If you wish to print checks, then use intuit checks
Product registration required
A 100% Macintosh-compatible printer if print of invoices, checks, purchase orders, reports and graphs.
Integration/Compatibility Requirements of QuickBooks Software:
Apple Mail, Outlook 2011 for Mac or Microsoft Entourage 2018 for e-mail
Internet connectivity is required for QuickBooks Payroll for Mac and Adobe Reader is required to print checks and forms.
Apple Numbers ’09, Microsoft Excel 2008 or 2011 to export report information
QuickBooks for Mac 2016 supports one-side conversion from QB for Windows OS 2012, 2013, 2014, and 2016.
Intuit Merchant Service is required to accept credit and debit cards directly into QB 2016 for Mac.
If QB is integrated with Mac, then a paid subscription, internet access and EIN are required to process payroll.
For Windows: Windows 10,
Windows 7 and Windows 8.1
For Mac: Mac OS X 10.11 (El Capitan), Mac OS 10.9 (Mavericks), and Mac OS X 10.10 (Yosemite)
Display Required:
1280*800 screen resolution or higher than that
Between 1200*800 and 1600*900
It's Between 1600*1200 and 1920*1200
Between 1920*1440 and 2560*1440
Up to 200% DPI
Extended monitor support
Winding up!
The blog will be quite useful for you to find the minimum system requirements for QuickBooks desktop. If you wish to seek more help or guidance, connect with our QuickBooks desktop support experts at toll-free number.
Here is how you can configure firewall settings for QuickBooks to set up multi-users in QuickBooks:
Firewall and security settings can often be a complex area when it comes to optimizing your QuickBooks accounting software. Firewall is basically a must to have as an application as it saves the system from different threats including malware, viruses, and unwanted programs. Often firewall blocks the internet access needed to run QuickBooks desktop and the company file. You can experience such an error when using QuickBooks desktop in multi-user environment.
This comprehensive guide will illuminate the process of configuring firewall settings for QuickBooks and outline all the relevant procedures involved in adjusting your security settings. If you're looking to understand what it takes to fine-tune your firewall and security for QuickBooks, carefully scroll through this segment. For personalized expert advice, don't hesitate to give us a call on our QuickBooks technical support line.
Procedure to configure firewall and security settings for QuickBooks desktop
You are suggested to perform the below set of steps for configuring firewall and security settings for QuickBooks accounting software.
Step 1: To configure firewall settings for QuickBooks, initially, set up the QuickBooks Tools Hub
So as to use the QuickBooks tool hub program, shutting down QuickBooks software is the first and foremost step. Moreover, while opting for Tool Hub on Windows 10, 64-bit is believed to be the best choice for a seamless experience.
Kick start the procedure by closing QuickBooks.
Head forward by downloading the recent version of the tool hub.
Make things easy by saving the file to a folder therefrom it can be easily accessed in future.
Most importantly, in case you have installed the tool hub previously, then you can spot the version you are using. Head to the home tab and you will be able to find the version at the bottom.
Opt for and open the file downloaded in the previous step.
Performing the steps that pop up on your screen would take you further in the process.
After the installation process concludes, double-tap the icon on the Windows desktop to open the tool hub.
Mark that, if you are unable to spot the icon, search for the same in windows and choose the program.
Step 2: Run the QuickBooks File Doctor tool
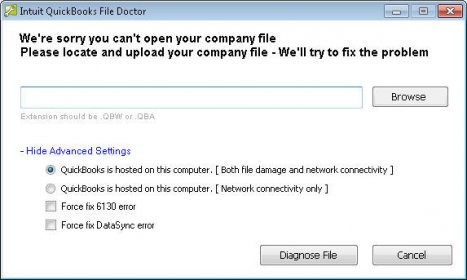
Under the QuickBooks tool hub, you need to opt for Company File Issues.
The file doctor tool might take a couple of minutes to open.
You need to note that if the tool doesn't open up, then look for the QuickBooks file doctor tool and open it manually.
Once it opens up, you need to tap on the company file from the dropdown menu.
In case identifying the file becomes difficult for you, then you are suggested to hit on Browse and search to find your file.
Head for Check your file and network and then Continue.
Fill in the QuickBooks admin password.
Hit next.
One of the most important points to note is that the scan time depends on your file size. Often, it can take up to 5 minutes. When the scan finishes, you need to open QuickBooks and your company file. The scan may say it was unsuccessful even if it fixes your issue.
Step 3: Updating and configuring the firewall manually
Afterward, enter the windows firewall and also hit on windows firewall and open the same.
Head to the advanced settings tab.
Then, right-click on the inbound rules and opt for the new rule.
Tap on port and hit the next tab.
Ensure to hit on TCP.
Insert the ports needed for your QuickBooks year version
QuickBooks desktop 2021: 8019, XXXXX
QuickBooks desktop 2020: 8019, XXXXX
QuickBooks desktop 2019: 8019, XXXXX
QuickBooks desktop 2018: 8019, 56728, 55378-55382
QuickBooks desktop 2020: 8019, 56727, 55373-55377
The point to be noted here is that QuickBooks desktop 2019, 2020, 2021 and upcoming versions use dynamic ports. These are firewall ports mentioned during installation. The format of the port for QuickBooks desktop 2019 and later version is said to be 8019, XXXXX.
Steps to get the dynamic port number
Perform the below steps to get the dynamic port number. The steps are easy to follow, the only prerequisite is that you follow them sequentially.
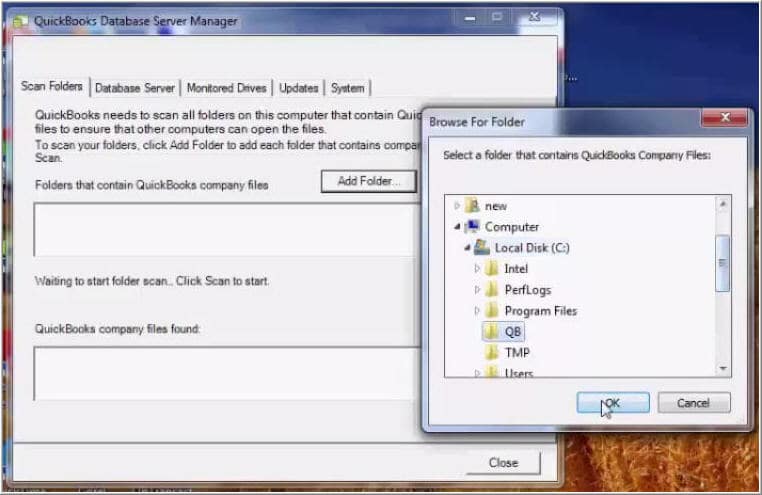
You need to change the port number by hitting on the new tab. Find out the scan folder tab and also opt for the scan now tab. This will basically reset the firewall permissions, but you can only upgrade ports for QuickBooks 2019 and later versions.
Once you are able to enter port no., you need to hit on the next tab.
Then, choose to allow the connection, and later on, hit the next tab.
Check mark all profiles and then hit on next.
Create a rule and name it as QBPorts
Hit the finish tab.
For creating outbound rules, perform a similar set of steps. Move to QuickBooks desktop and switch to multi-user mode. Open QuickBooks on the network from one of the host systems.
Steps for creating windows firewall exceptions for QuickBooks programs
Initiate the procedure by heading to the windows start menu.
Type in 'windows firewall' and double-tap on the windows firewall to open the same.
Then, hit on the advanced settings.
Right-click on the inbound rules and tap on the new rule.
Furthermore, choose the program option and head to the next tab.
Head to the program path and also opt for the browse tab.
Look for and tap on one of the executable files on the chart above.
Hit the next tab.
Opt for allow the connection option and hit on the next tab.
Ensure that all the profiles should be marked and also tap on the next tab.
Generate a rule and later on assign a name to it.
You are required to create outbound rules and also repeat the steps for outbound.
In case you can notice program files, then it indicates that you are using the 64-bit operating system. You need to move to QuickBooks desktop and also switch to multi-user mode.
Check your antivirus or firewall settings
In case you configured the firewall but continue to land into similar issues, then checking the antivirus settings would be the best-recommended solution. You are also required to ensure that QuickBooks has general permissions. This ensures that it is not blocked. However, the procedure might be different. You can have a look at the procedure to set up permissions for your antivirus software.
Add QuickBooks ports exception on your antivirus or firewall
Are you still experiencing the same issue when opening the file over a network or in multi-user mode? A solution to that is to add port exceptions for the executable files listed in the table above.
Ascertain that the TCP is opted right and also type in the ports required for the QuickBooks version. The port numbers are mentioned in the step related to configuring the firewall manually. Also, keep in mind that if you are using different or multiple versions of QuickBooks desktop, then adding each year's ports is recommended.
Restart your computer
A couple of programs demand rebooting the system, so as to save the changes. After you are done with the procedure above, you need to reboot the system and try opening QuickBooks now.
Still unable to configure firewall settings for Quickbooks?
Having explored the steps mentioned above, you should be able to configure firewall and security settings for QuickBooks. However, if that isn't the case, all you need to do is to get on a call with our QuickBooks technical support professionals using the support line. Our customer executives will be more than interested in answering your queries associated with this accounting software.
Learn how you can fix any error using the QuickBooks component repair tool
Are you encountering frustrating installation errors like QuickBooks Error 1603, 1935, 1904, or 1402? These tricky issues can severely disrupt your QuickBooks experience. The good news is, there's a powerful and free solution: the QuickBooks Component Repair Tool.
This essential tool is designed to automatically diagnose and fix problems within the critical Microsoft components that QuickBooks relies on, including the .NET Framework, MSXML, and Visual C++. By addressing these underlying system issues, the Component Repair Tool ensures a smoother QuickBooks installation and prevents common operational glitches.
In this detailed guide, we'll walk you through everything you need to know about this invaluable tool. Learn how to download, install, and effectively use the QuickBooks Component Repair Tool to resolve those stubborn installation errors and get your QuickBooks up and running flawlessly.
What is The QuickBooks Component Repair Tool? An Overview
QuickBooks component repair tool can be downloaded and used to generally fix common installation issues. This tool is designed and developed in a way to resolve issues that can be experienced during the usage of .NET framework and other windows components needed to run QuickBooks. What makes this tool even better is that it doesn't demand any specific configuration and it automatically scans the components. You can try fixing the below set of errors, using the QuickBooks component repair tool:
The QuickBooks component repair toolcan be downloaded without any additional charges and can be of great assistance in fixing errors associated with QuickBooks.
Steps to Download QuickBooks Component Repair Tool
To automatically scan and repair QuickBooks components, first of all, you have to Download the QuickBooks Component Tool. But the positive thing is that this tool it doesn’t require any specific system configuration or requirement. Follow the below given steps to download this tool:
First of all, you need to make an exit from all the Open programs.
After that, reboot your computer system once.
Download the QuickBooks Component Repair Tool from here.
You need to double-click on the saved file to Run or execute the setup file.
Once the tool successfully installed on your computer reboot your computer once more time.
Steps to Fix common Installation Errors in QuickBooks
Run the program by double-clicking on the downloaded file.
Delete all the executive programs and scan your QuickBooks files using this component repair tool.
Restart your computer after running the tool.
Steps to Download Windows Updates
Expired Windows
will not allow you to Install/Open QuickBooks on your system. Your QuickBooks
may face several errors, and the Outdated Windows misses updates related to
Visual C++, .NET Framework, MSXML, etc.
Update Windows on your desktop by hitting on the Windows Key on the keyboard & type ‘Windows update’
After that, tap on the Check for updates option.
Download and install all the updates (if there any)
Once the windows is updated, restart or reboot the computer.
After the download is complete, Save the file to a local desktop.
Close all Running programs before running this tool
Now, restart the system after you have to RUN the tool
The problem should be solved by now and if it still exists then use QuickBooks component repair tool to resolve the issues.
Manually Fix Errors with Microsoft Components Using QuickBooks Component Repair Tool
If QuickBooks Component Repair Tool hasn’t worked and the problem still persists, then you need to manually fix errors related to the Microsoft components by:
Rebuilding/repairing Microsoft .NET Framework
Reconstructing/repairing Microsoft MSXML
Step 1. Rebuilding/Repairing Microsoft .NET Framework
The Microsoft .NET Framework is a Microsoft component that is used by QuickBooks to connect with web apps. Several errors and issues are faced by users which can be resolved by following the below steps:
The first step is to download the QuickBooks Component Repair Tool to your computer system.
When prompted, Save/Store the file on the local desktop.
Close all the "Open programs" and applications & double-click on the QBInstall_tool_v2.exe file
Restart your computer after process diagnosis is complete.
The above-mentioned process will Repair Microsoft .NET Framework, however, if still there is an error then follow the below steps:
Hit on the Windows Key
Head to the Search bar and type 'Windows Update.'
Now, opt for the check for Updates option.
Step 2. Reconstructing/Repairing Microsoft MSXML
QuickBooks will not run because of the damaged Microsoft MSXML component. To repair the damaged MSXML component, please find the below steps.
Register the ‘MSXML DLL files’
Uninstall & Reinstall MSXML 6.0
Download & Install the MSXML 6.0 SP1
Now, go for repairing the MSXML 6.0.
Winding up!
We hope that you find this article helpful in installing and using QuickBooks Component Repair Tool. In case you require any further help in installing this useful tool, you can contact our certified QuickBooks desktop support experts. Thanks for visiting us, and spending your valuable time in reading this article till the end. We expect that the information provided in this article might have helped in making the best of this tool.
A Guide to resolve data damage of QuickBooks Desktop
Encountering data issues with your QuickBooks company files can be a critical issue, potentially leading to missed deadlines and the loss of vital company information. If you suspect your QuickBooks data is compromised, this guide is designed to help you resolve the majority of these problems efficiently.
This article provides actionable solutions to address common QuickBooks data damage issues, helping you protect your crucial financial records.
However, if you're looking to save valuable time and effort or prefer expert assistance, our dedicated U.S.-based support team of Certified ProAdvisors is available round-the-clock to provide immediate help.
Fix Data Damage On Your QuickBooks Desktop Company File
There are only two ways to resolve the data damages on your QuickBooks company file.
Run the Rebuild Utility
Run the Verify Utility
Step 1: Rebuild data utility
Rebuild data utility is a useful tool you will have to run first to start troubleshooting data damage on your QuickBooks file.
Open the 'File menu' and hit on 'Utilities and Rebuild Data'.
After the QuickBooks Information window pops up, hit on 'OK'. Save a backup by simply following the prompts. (Important: Don’t be confused if your computer displays that QuickBooks is not responding. If your mouse cursor is moving, the 'Rebuilding process' is on. Wait patiently and allow the process to finish.)
After your computer displays to you that Rebuild has completed, hit on 'OK'.
Step 2: Verify data utility
Run the 'Verify data utility', which is the next step tofix data damage on your QuickBooks file.
Open the 'File menu' and opt for 'Utilities and Verify Data'.
If QuickBooks detects no issues with your data, tap on 'OK'. You may keep on using your company file.
If any issues are spotted with your data, you will receive a prompt to 'Rebuild Now' or 'View Errors'. Hit on 'Close' and you will have two options to choose from:
Review Last Verify/Rebuild
Tap on the 'F2' or 'Ctrl+1' keys on your keyboard and the 'Product Information' window will open on your computer screen.
Choose the 'Review Last Verify/Rebuild' option.
Check the results screen for errors.
ReviewQBWin.log
Do you know how to review the QBWin.log or the QuickBooks.log file? If your answer is yes, you can follow the given steps. (It’s recommended to contact a certified expert or our support for additional help in case you are not comfortable doing that on your own).
Find 'QBWin.log' or 'QuickBooks.log' files. (In case you seeking the help of a support agent, Press 'F2' followed by 'F3' to open the 'Tech Help' window. Once you are at 'Open File tab', click the log file once and click send log files to Intuit support. This process will forward the file to a repository and will finally allow the support agent to check your log files.
Check the log file.
Windows: Type Begin Verify in the search box (Ctrl+F keys) and spot the most recent file (it would be simple as logs are written in date order with the latest at the bottom).
Mac: Go to the bottom to find the most recent Verify information.
Find 'LVL_ERROR', copy the complete line and then search it on Inuit’s support site. (Note: Errors within MS Windows as well as Mac log files may differ slightly. However, they are displayed in the same format.)
Step 3: Repair your company file using QuickBooks file doctor
It can take up to one minute for the file doctor to open.
Next, choose your company file from the drop-down menu in QuickBooks File Doctor.
In case you don’t see your file, choose Browse and search to find your file.
Now, opt for Check your file and then hit on Continue.
Now, finally, put your QuickBooks admin password and then opt for the Next tab.
Fixing Data Damage Solutions for QuickBooks Desktop for Mac
Use the verify tool in QuickBooks for Mac for scan the company file for errors or damage.
Choose the file and choose Utilities tab.
You now have to select Verify data, and hit on the ok tab to close all windows.
In case you see Your data has failed the integrity check, then you need to Rebuild the file.
If there are No issues with the data, then you are done with the process.
Steps for rebuilding the company file data
Choose the File and also hit on Utilities.
Furthermore, tap on Rebuild data and choose the OK tab to close all windows.
QuickBooks will ask to make a backup before rebuilding the company file and tap on the OK tab. In case you don't want to backup, then hit on Cancel to continue rebuilding the company file.
In case you haven't Set up any backup preferences, QuickBooks will ask to update them. Choose the Backup preferences and Edit as required and hit on the OK tab.
After the backup is finished, then opt for a show-in finder to locate the backup or tap on the OK tab.
Hit on the OK tab and Rebuild in finished.
Step 4: Manually repair the company file by rebuilding the data
The very first step is to go to the File menu.
After that you need to hover over Utilities.
And next select Verify Data.
Let the tool check your file for data issues.
Next step is to select Expand All to see the errors, from the Verify Results screen,
At last, select See Online Article.
How to Identify Data Damage in QuickBooks Desktop Company File?
There are innumerable ways of identifying the data damage in the QuickBooks company file. The most conspicuous signs include the following:
If you encounter an error, like data issues, that hinders QuickBooks from continuing in the verify data utility or verify target, if the values in minor do not match the screen or the QBwin.log file.
Also, sudden or abrupt shutdown of QuickBooks, when trying to save or remove a transaction.
Any transactions are missing from the list.
The paid bills and invoices are reflected as unpaid.
If the transactions history shows a negative balance.
QuickBooks is slow and the operations performed are consuming more time than usual to finish.
Why data damage occurs in QuickBooks?
Data damage may occur for a variety of assorted reasons. the most prominent causes are highlighted below:
The file size expanded beyond the recommended healthy limit.
Lack of resources, like RAM, network cables, etc.
The system shuts down due to technical glitches in the mid of the process.
Trojan malware attack
A sudden power surge or drop ending in trashing the entire hard drive leading to such an error
Preventive actions
Before you head to the steps, there are certain actions you need to take:
Choose a hard-wired network over wireless: This is suggested, as in case you make use of a wireless network, it might enhance the risk of dropped connections, which in turn create issues with the data file. These issues can be avoided by opting for a hard-wired network
Create a backup within QuickBooks: Often the files are automatically backed up in QuickBooks, which helps a lot. However, when the log file is created and continues to increase in size, the performance starts getting hampered, and this increases the risk of data corruption unless you take the backup. This backup file is later used by Intuit for data recovery.
Check the file size: QuickBooks pro and premier users can opt for a 250 MB file. When the file size reaches 500 MB, it might turn down to sluggish performance. The QuickBooks enterprise users can select 500 MB. When this file reaches 750MB, it might start creating issues.
Update patches: You can check the release number in the first line of the product information window. Using the latest patch might not create such an issue later.
Keep a check on the database file fragments monthly: You can end up in fragmentation if the system gets filled up with the data over time. In case you are putting in the data without carrying out a cleanup in it.
Finalizing up!
We hope that you are able to fix your QuickBooks data damage issues by after reading this post. In case the issue persists even after trying the troubleshooting steps in this post, you can contact our QuickBooks error support team.
We offer quick and precise solutions related to all accounting related issues and are reachable round the clock.





















 +1-888-368-8874